
 magazine
How to Set Up an Automated Batch Processing Pipeline for the OpenAI API (GPT-4o-mini)
A complete guide to an automated batch processing pipeline with the OpenAI Batch API, Supabase and FastAPI: from creating batch jobs to saving the results.
Introduction
Now a days utilising LLM’s for processing data on enterprise level has become a topic of dicussion . Lot of companies are heavliy investing in this segment of LLM finetuning , pre training , so that they are not left behind in the race .
But that being said LLM’s require a significant amount of investment , and even the cost for hosting an LLM or for inferencing is quite high due to the huge compute resource requirements of the LLM models .
In this blog we are going to explore , how we can process huge volume of data utilsing OpenAI API , we will be utilising supabase database to store the data . Supabase is a relational database .
If you are new to supabase , I will reccommend to get familiar with supabase , so that you can follow this tutorial with ease .
That being said , I am just using supabase here as an example , If you are experienced with utilising any kind of database may it be relational or non - relational databases , like AWS RDS (Relational Database service) , Dynamo DB (NoSql or Non-relational database) . You just have to implement the ingestion layer corresponding to your database .
I will be utilising python programming language and FastAPI framework , to build API’s , to ingest the data from the database , process the data to bring into the format required by OpenAI batch processing service .
I would also be utilising concepts such as triggers and database functions , and these would be written in PostgreSql , again if you are not familiar with it , no need to worry , I have added comments for each line which can be helpful to understand .
It would be useful if you can go through basics of SQL and get an understanding of SELECT , CREATE , FOR EACH , DELETE , etc .
You can go through resources like w3 schools or tutorials points or there are plenty of resources available on youtube as well .
Why use batch processing?
Imagine you have 50,000 data points to process with OpenAI’s GPT-4o-mini API. The first idea that comes to mind is a simple loop that sends one request at a time. That approach has a few drawbacks:
- If your code is deployed on a server, it keeps executing for all 50,000 requests, and that many data points means a lot of tokens to process, which can add up to a hefty bill. You can refer to the pricing page OpenAI publishes.
- If the code throws an error partway through, further execution stops. You might start 50,000 requests at night, hoping they finish by morning, and wake up to find only 5,000 completed.
- If you run it on your local machine, any internet failure stops the execution.
OpenAI’s Batch API avoids all of this. Batch requests cost 50% less than the same requests sent one by one, and they run against a separate pool of higher rate limits. To follow along, set up an OpenAI account and create an API key at https://platform.openai.com/settings/organization/api-keys.
How a batch request is shaped
The batch file, in the jsonl format, should contain one line (json object) per request. Each request is defined as such:
{
 “custom_id”: <REQUEST_ID>,
 “method”: “POST”,
 “url”: “/v1/chat/completions”,
 “body”: {
 “model”: 'gpt-4o-mini',
  "temperature": 0.2,
 “messages”: [
    {
       "role": "user",
       "content": f"{text}"
    },
  ]
 }
}
Note: the request ID should be unique per batch. This is what you can use to match results to the initial input files, as requests will not be returned in the same order.
You don’t have to save this file to disk. Building it in memory is what lets the whole pipeline run on a server and be automated with triggers and cron jobs, as you will see below.
Usecase : In this example, we will use gpt-4o-mini to extract movie categories from a description of the movie. We will also extract a 1-sentence summary from this description.
Now let’s see into how we can create the automated pipeline .
Step 1: Set up database functions and triggers in Supabase
On the left side you will find an option to select SQL editor .
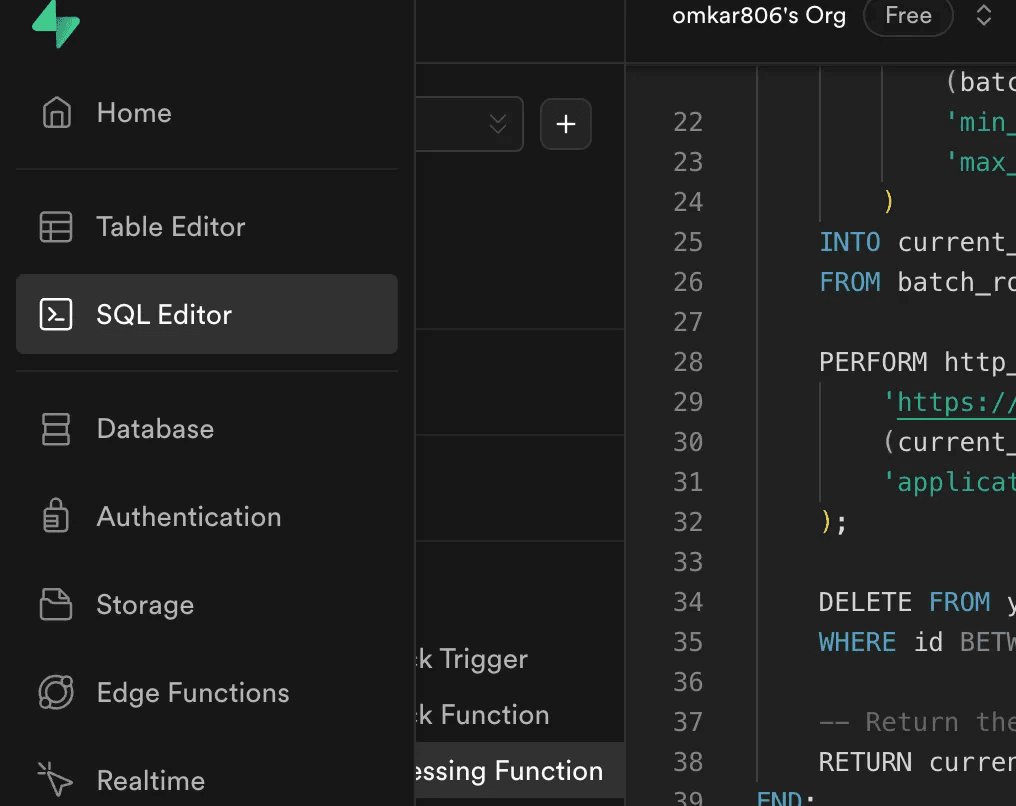
Once you are in the editor create a new snippet as you can in the above image .
Let’s first create the Batch processing function .
The purpose of this function would be to ingest the 1000(as supabase allows minimum 1000 rows in its fetch operation but it could be changed if you want it for enterprise you can check supabase documentation) rows of data , and pass this data to the API , an endpoint that we would create using FastApi .
Here is the PostgreSQL snippet
CREATE OR REPLACE FUNCTION process_batch_data_v3()
RETURNS json AS $$
DECLARE
    last_processed_id BIGINT;
    current_batch_data json;
    start_id BIGINT;
    end_id BIGINT;
BEGIN
    WITH batch_rows AS (
        SELECT
            imdb_id, -- row names
            "Description",
            ROW_NUMBER() OVER (ORDER BY imdb_id) as rn
        FROM your_table_name
        LIMIT 1000
    )
    SELECT
        json_build_object(
            'data', (SELECT array_to_json(array_agg(row_to_json(batch_rows)))) ,
            'min_id', MIN(imdb_id),
            'max_id', MAX(imdb_id)
        )
    INTO current_batch_data
    FROM batch_rows;

    PERFORM http_post(
        'Our FastApi endpoint',
        (current_batch_data)::text,
        'application/json'
    );

    DELETE FROM your_table_name
    WHERE id BETWEEN start_id AND end_id;

    RETURN current_batch_data;
END;
$$ LANGUAGE plpgsql;
Replace your_table_name with your actual table name that you have give for your table.
Just execute the above code and a data ingestion database function will be created for 1000 rows , which can be passed for batching using OpenAI API.
Once the rows are passed for batch processing those rows would also be deleted , for taking up next 1000 rows.(Another approach would be to add another column to add a check that batch processing for this row is completed.)
Now lets setup the database function for the trigger which would tell us when 1000 rows are available in our database .
Database function for Trigger
CREATE OR REPLACE FUNCTION check_row_count()
RETURNS TRIGGER AS $$
DECLARE
    row_count integer;
BEGIN
    SELECT COUNT(*) INTO row_count FROM your_table_name;

    IF row_count = 1000 THEN
        PERFORM process_batch_data_v3();
    END IF;

    RETURN NEW;
END;
$$ LANGUAGE plpgsql;
Replace your_table_name with your actual table name .
Just execute the above code and your database function which would act as a trigger would be created .
Let’s setup the trigger for the above database function check_row_count().
CREATE TRIGGER check_row_count_trigger
AFTER INSERT ON imdb_dataset
FOR EACH ROW
EXECUTE FUNCTION check_row_count();
Step 2: Create the FastAPI endpoint that creates the batch job
You can run this endpoint locally or you can deploy this endpoint on hugging face spaces on docker and utilise it as a server .
I will give you the code for setting it up locally .
Lets first install all the libraries needed.
pip install supabase openai fastapi python-dotenv uvicorn
Here is the code below
from fastapi import FastAPI, Request
import os
import json
import io
from dotenv import load_dotenv
from supabase import create_client, Client
from openai import Client as OpenAIClient
import logging

app = FastAPI()

# Load environment variables
load_dotenv()

# Initialize OpenAI client
client = OpenAIClient(api_key=os.getenv('OPENAI_API_KEY'), organization=os.getenv('ORG_ID'))

# Initialize Supabase client
url: str = os.getenv('SUPABASE_URL')
key: str = os.getenv('SUPABASE_KEY')
supabase: Client = create_client(url, key)

@app.post("/test/v1")
async def testv1(request: Request):
    system_prompt = '''
        Your goal is to extract movie categories from movie descriptions, as well as a 1-sentence summary for these movies.
        You will be provided with a movie description, and you will output a json object containing the following information:

        {
            categories: string[] // Array of categories based on the movie description,
            summary: string // 1-sentence summary of the movie based on the movie description
        }

        Categories refer to the genre or type of the movie, like "action", "romance", "comedy", etc. Keep category names simple and use only lower case letters.
        Movies can have several categories, but try to keep it under 3-4. Only mention the categories that are the most obvious based on the description.
    '''

    dataset = await request.json()
    tasks = []
    for ds in dataset.get('data', []):
        imdb_id = ds.get('imdb_id')
        description = ds.get('Description')
        task = {
            "custom_id": f"task-{imdb_id}",
            "method": "POST",
            "url": "/v1/chat/completions",
            "body": {
                "model": "gpt-4o-mini",
                "temperature": 0.1,
                "response_format": {
                    "type": "json_object"
                },
                "messages": [
                    {
                        "role": "system",
                        "content": system_prompt
                    },
                    {
                        "role": "user",
                        "content": description
                    }
                ],
            }
        }
        tasks.append(task)

    # Write tasks to a JSON object
    json_obj = io.BytesIO()
    for obj in tasks:
        json_obj.write((json.dumps(obj) + '\n').encode('utf-8'))

    # Create a batch job
    batch_file = client.files.create(
        file=json_obj,
        purpose="batch"
    )
    batch_job = client.batches.create(
        input_file_id=batch_file.id,
        endpoint="/v1/chat/completions",
        completion_window="24h"
    )

    save_data = {
        'batch_job_id': batch_job.id,
        "batch_job_status": False
    }

    # Save batch job details to Supabase
    response = supabase.table("batch_processing_details").insert(save_data).execute()

    return {'data': 'Batch job is scheduled!'}

if __name__ == "__main__":
    import uvicorn
    uvicorn.run(app, host="0.0.0.0", port=8000)
So above is the code utilising fastapi and openai batch processing .
I will explain what exactly the code does , so the below part of the code
dataset = await request.json()
extracts the data from the sent from the database function.
tasks = []
    for ds in dataset.get('data', []):
        imdb_id = ds.get('imdb_id')
        description = ds.get('Description')
        task = {
            "custom_id": f"task-{imdb_id}",
            "method": "POST",
            "url": "/v1/chat/completions",
            "body": {
                "model": "gpt-4o-mini",
                "temperature": 0.1,
                "response_format": {
                    "type": "json_object"
                },
                "messages": [
                    {
                        "role": "system",
                        "content": system_prompt
                    },
                    {
                        "role": "user",
                        "content": description
                    }
                ],
            }
        }
        tasks.append(task)
This code goes through each row and constructs a openai request json which is a required format for openai.
# Write tasks to a JSON object
    json_obj = io.BytesIO()
    for obj in tasks:
        json_obj.write((json.dumps(obj) + '\n').encode('utf-8'))
Above code loads json required to pass for batch process in memory without requiring to save it locally or even on a cloud bucket . But this depends on the amount of data you would ingest and as long as you have enough memory on server as well .
# Create a batch job
    batch_file = client.files.create(
        file=json_obj,
        purpose="batch"
    )
    batch_job = client.batches.create(
        input_file_id=batch_file.id,
        endpoint="/v1/chat/completions",
        completion_window="24h"
    )

    save_data = {
        'batch_job_id': batch_job.id,
        "batch_job_status": False
    }

    # Save batch job details to Supabase
    response = supabase.table("batch_processing_details").insert(save_data).execute()
Above code is a standard code for creating a batch job where we pass the in-memory json object we have created , and then we create the batch by client.batches.create with , completion endpoint and completion_window parameters .
Now we extract the batch job id , and we will save this data onto a seperate table batch_processing_details , that you will have create along with columns batch_job_id , batch_job_status , id , created_at .
You can run the above code using below command
python your_file_name.py
you will get the endpoint below one you run the command locally .
Now you have to pass the endpoint I have given below to your database function . Here is the endpoint .
http://0.0.0.0:8000/test/v1
You have to pass the endpoint in this database function .
CREATE OR REPLACE FUNCTION process_batch_data_v3()
RETURNS json AS $$
DECLARE
    last_processed_id BIGINT;
    current_batch_data json;
    start_id BIGINT;
    end_id BIGINT;
BEGIN

    -- Get the batch data
    WITH batch_rows AS (
        SELECT
            imdb_id,
            "Description",
            ROW_NUMBER() OVER (ORDER BY imdb_id) as rn
        FROM imdb_dataset
        LIMIT 1000
    )
    SELECT
        json_build_object(
            'data', (SELECT array_to_json(array_agg(row_to_json(batch_rows)))) ,
            'min_id', MIN(imdb_id),
            'max_id', MAX(imdb_id)
        )
    INTO current_batch_data
    FROM batch_rows;

    PERFORM http_post(
-- pass the endpoint here as given
        'http://0.0.0.0:8000/test/v1',
        (current_batch_data)::text,
        'application/json'
    );

    DELETE FROM your_table
    WHERE id BETWEEN start_id AND end_id;

    -- Return the batch data
    RETURN current_batch_data;
END;
$$ LANGUAGE plpgsql;
Replace your_table_name with your actual table name .
Run this code again on the SQL editor tp update the function with desired endpoint .
Step 3: Load the IMDB data into Supabase
Note: If you already have a different database filled with data, then you can just skip this step.
Let’s dowload the data and store it into supabase .
You can download your data here: Dataset
You may have to modify the dataset as it contains one empty column when you download it .
If you are new to supabase then you may have to create a new project and add a new table . You can just go through this 2 mins tutorial : tutorial
Above tutorial will show you to setup the project and create tables .
Now create a table with these columns imdb_id(as primary key) , created_at (Both these columns would be already present just rename id as imdb_id) , Title , Certificate , Duration , Genre , Rate(datatype float8) , Metascore(int8) , Description(text) , Cast(text) , Info(text) .
Now upload your csv data that you had downloaded .
Go to Insert>Import Data from CSV , as shown below.
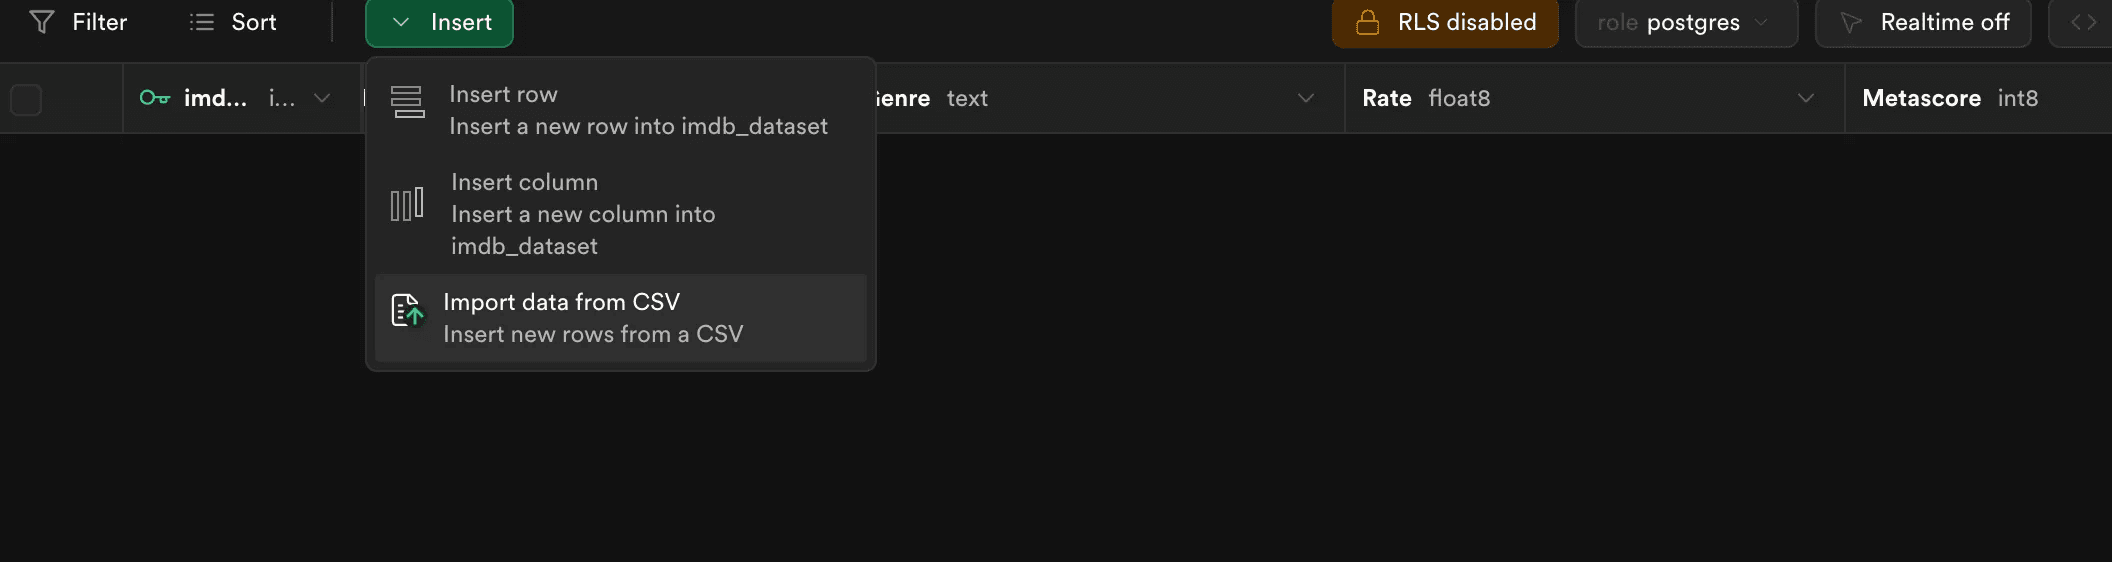
Now upload your data , by clicking on browse .
Once the whole 1000 rows are uploaded , the database function would be triggered and the 1000 rows data would be passed to the endpoint , and they would be sent for batch processing .
Step 4: Create a table for the batch outputs
Next, set up the table where you will save the outputs that come back from batch processing (OpenAI API, GPT-4o-mini). Its shape depends on your data if you are using a totally different dataset.
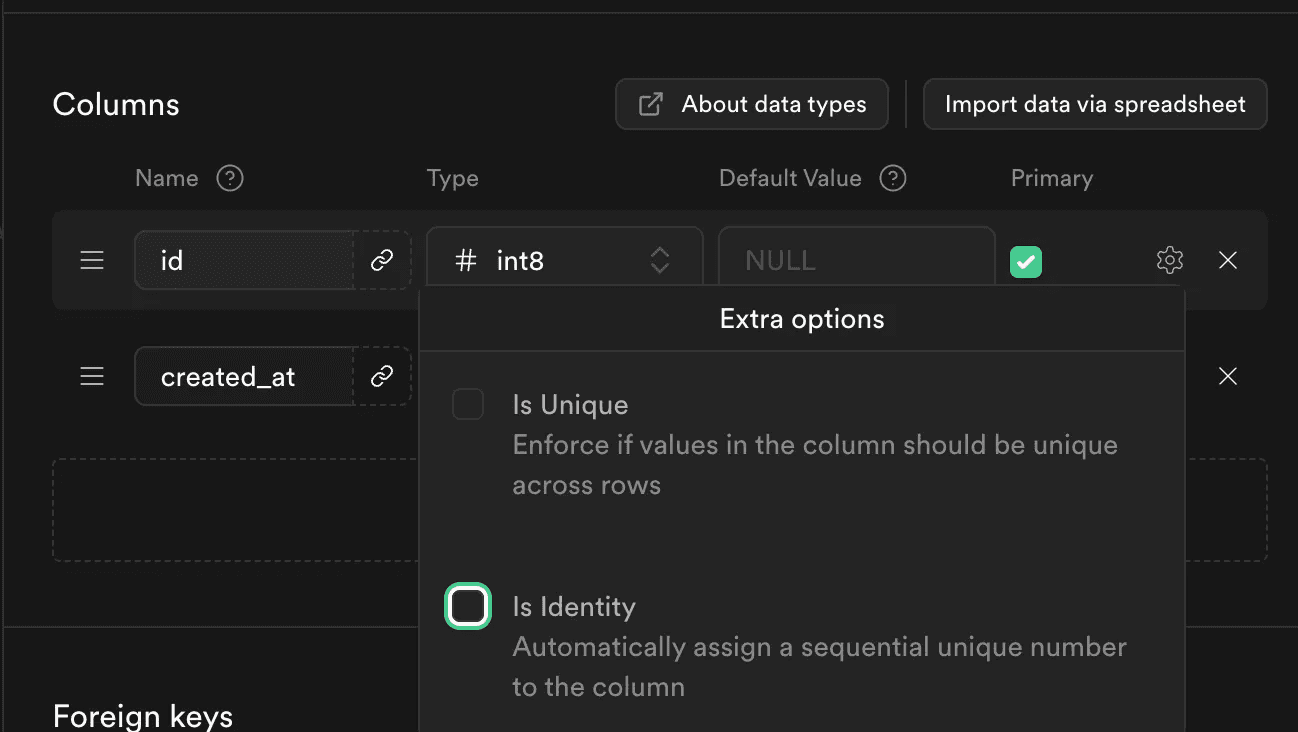
For the IMDB data from Step 3, create a table with the columns id, created_at, description, categories and summary. Set the id column without Is Identity, as shown below.
Step 5: Create the database function that checks for completed batches
This database function reads each batch_job_id from the batch_processing_details table you created in Step 2 and asks an API endpoint whether that batch job has finished.
In the SQL editor run this code and your database function would be created.
CREATE OR REPLACE FUNCTION check_batch_processing_completion()
RETURNS void AS $$
DECLARE
    row_record RECORD;
    api_response JSON;
    row_json JSON;
    batch_status text;
BEGIN
    FOR row_record IN SELECT * FROM your_table_name WHERE batch_job_status = FALSE
    LOOP
        -- Make an API call to the external endpoint
        -- Replace 'your_api_endpoint' with the actual API endpoint
        -- and 'column_to_send' with the column name to send to the API
        row_json := json_build_object('batch_job_id', row_record.batch_job_id);
        SELECT content::json INTO api_response
        FROM http_post(
            'http://0.0.0.0:8000/test/batch_processing_result',
            row_json::text,
            'application/json'
        );

        batch_status := api_response->>'batch_job_status';
        -- Update the column_to_check with the API response
        UPDATE your_table_name
        SET batch_job_status = CASE
            WHEN batch_status = 'completed' THEN TRUE
            WHEN batch_status = 'notcompleted' THEN FALSE
            ELSE batch_job_status  -- Keep existing value if response is invalid
        END
        WHERE id = row_record.id;
    END LOOP;
END;
$$ LANGUAGE plpgsql;
Replace your_table_name with the name of your batch_processing_details table. The function goes through every batch job that is not marked complete, passes its batch id to the API from Step 7, and marks the row complete once the API reports that the batch job has finished. The API then pushes the results into the outputs table.
Step 6: Schedule the cron job
SELECT cron.schedule('0 */2 * * *', 'SELECT check_batch_processing_completion();');
Now this cron job is setup which will run the database function every 2 hours.
If you would rather poll from Python than use a cron job, you can check the status of a batch job in a loop:
batch_job = client.batches.retrieve(id)

while batch_job.status == 'in_progress':
    batch_job = client.batches.retrieve(id)
    print(batch_job.status)
    if batch_job.status == 'completed':
        break
    time.sleep(60)
Step 7: Set up the FastAPI endpoint that saves the outputs
from fastapi import FastAPI, Request, BackgroundTasks
from supabase import create_client, Client
from openai import Client as OpenAIClient
import json
import uvicorn
from typing import Dict, List, Optional
import os
from dotenv import load_dotenv

# Load environment variables
load_dotenv()

# Initialize FastAPI app
app = FastAPI()

# Initialize Supabase client
supabase: Client = create_client(
    supabase_url=os.getenv("SUPABASE_URL"),
    supabase_key=os.getenv("SUPABASE_KEY")
)

# Initialize your OpenAI client
client = OpenAIClient(api_key=os.getenv('OPENAI_API_KEY'),organization=os.getenv('ORG_ID'))

@app.post("/test/batch_processing_result")
async def batch_processing_result(request: Request, background_tasks: BackgroundTasks):
    body = await request.json()
    batch_id = body.get('batch_job_id')
    batch_job = client.batches.retrieve(batch_id)
    # while batch_job.status == 'in_progress':
    batch_job = client.batches.retrieve(batch_id)
    print(batch_job.status)
    # Add the processing task to background tasks
    if batch_job.status == 'completed':
        background_tasks.add_task(process_batch_data, batch_id)
        return {"batch_job_status":'completed'}

    # Immediately return success response
    return {'batch_job_status':'notcompleted'}


async def process_batch_data(batch_id: str):
    try:
        batch_job = client.batches.retrieve(batch_id)
        if batch_job.status == 'completed':
            result_file_id = batch_job.output_file_id
            result = client.files.content(result_file_id).content
            json_str = result.decode('utf-8')
            json_lines = json_str.splitlines()

            res = []
            for line in json_lines:
                if line.strip():
                    try:
                        json_dict = json.loads(line)
                        res.append(json_dict)
                    except json.JSONDecodeError as e:
                        print(f"Error decoding JSON on line: {line}\nError: {e}")

            for resp in res:
                id = resp.get('custom_id')
                res_id = id.split('-')[1]
                output = json.loads(resp.get('response').get('body').get('choices')[0].get('message').get('content'))

                categories = str(output.get('categories'))
                summary = str(output.get('summary'))

                supabase_resp = supabase.table("imdb_dataset").select("Description").eq("imdb_id", res_id).execute()
                description = supabase_resp.data[0].get('Description')

                insert_response = (
                    supabase.table("imdb_outputs")
                    .insert({
                        "id": res_id,
                        "description": description,
                        'categories': categories,
                        'summary': summary
                    })
                    .execute()
                )
                print(f"Inserted data for ID: {res_id}")

    except Exception as e:
        print(f"Error in background processing: {str(e)}")
        # You might want to log this error or handle it in some way

if __name__ == "__main__":
    uvicorn.run(
        "main:app",
        host="0.0.0.0",
        port=8000,
        reload=True  # Enable auto-reload during development
    )
Utilise the above code to fetch all the data from the batch , that is completed and insert the data to the relevant column into the supabase database.
@app.post("/test/batch_processing_result")
async def batch_processing_result(request: Request, background_tasks: BackgroundTasks):
    body = await request.json()
    batch_id = body.get('batch_job_id')
    batch_job = client.batches.retrieve(batch_id)
    # while batch_job.status == 'in_progress':
    batch_job = client.batches.retrieve(batch_id)
    print(batch_job.status)
    # Add the processing task to background tasks
    if batch_job.status == 'completed':
        background_tasks.add_task(process_batch_data, batch_id)
        return {"batch_job_status":'completed'}

    # Immediately return success response
    return {'batch_job_status':'notcompleted'}
Above snippet actually checks if the batch process is compeleted or not and and then adds the task of inserting the data into the database to a background task , so that api response should not be delayed in the database function and does not face a timeout .
async def process_batch_data(batch_id: str):
    try:
        batch_job = client.batches.retrieve(batch_id)
        if batch_job.status == 'completed':
            result_file_id = batch_job.output_file_id
            result = client.files.content(result_file_id).content
            json_str = result.decode('utf-8')
            json_lines = json_str.splitlines()

            res = []
            for line in json_lines:
                if line.strip():
                    try:
                        json_dict = json.loads(line)
                        res.append(json_dict)
                    except json.JSONDecodeError as e:
                        print(f"Error decoding JSON on line: {line}\nError: {e}")

            for resp in res:
                id = resp.get('custom_id')
                res_id = id.split('-')[1]
                output = json.loads(resp.get('response').get('body').get('choices')[0].get('message').get('content'))

                categories = str(output.get('categories'))
                summary = str(output.get('summary'))

                supabase_resp = supabase.table("imdb_dataset").select("Description").eq("imdb_id", res_id).execute()
                description = supabase_resp.data[0].get('Description')

                insert_response = (
                    supabase.table("imdb_outputs")
                    .insert({
                        "id": res_id,
                        "description": description,
                        'categories': categories,
                        'summary': summary
                    })
                    .execute()
                )
                print(f"Inserted data for ID: {res_id}")

    except Exception as e:
        print(f"Error in background processing: {str(e)}")
        # You might want to log this error or handle it in some way
Above code snippet fetches the output of the batch , loads that into the json in memory and parses the json and extracts relevant output from the batch output json and inserts the data into the output supabase table.
Each result line also reports its token usage, so you can store the prompt and completion token counts alongside your outputs:
for (ress) in res:
    # print("LLM OUTPUT")
    custom_id = ress.get('custom_id')
    output=ress.get('response').get('body').get('choices')[0].get('message').get('content')
    prompt_tokens = ress.get('response').get('body').get('usage').get('prompt_tokens')
    completion_tokens = ress.get('response').get('body').get('usage').get('completion_tokens')
Conclusion
Batch processing is a reliable way to handle large amounts of data. It lets you automate workflows, streamline data processing and manage costs more effectively.
The process stays the same whatever database you use: set a trigger that fires when you have a significant number of rows, pass that data to an API endpoint that creates a batch job, and save the batch_job_id to a table as a log. Then a cron job checks at regular intervals whether each batch has completed, and a second endpoint collects the results and saves them to your database.
The hussh magazine
Written by Omkar Malpure, and built to read beautifully here — and to travel to 🤫 One on your phone, your glasses, and visionOS, as one immersive magazine you own.